Sunday, March 29, 2015

Practice Technique -- The Pyramid


The last technique I'd like to explore in this series on practice techniques is what I call "The Pyramid".

This is the best technique I know for building consistency and routine in execution of the most difficult passages.

Through multiple repetitions of a passage at carefully paced speeds, I can achieve a confidence, ease and reliability with just about any piece of music.

The Pyramid is methodical and somewhat time-consuming. It takes its inspiration from physical training. Anyone who has run intervals on a track or does strength training will find this method familiar.

Here are some instructions for use:

1. Choose speeds and number of repetitions that match your short-term goal for the passage in question.

2. For a passage that is nearly ready for performance at an audition or a concert, at first choose a top speed that is 85-90% of performance tempo.
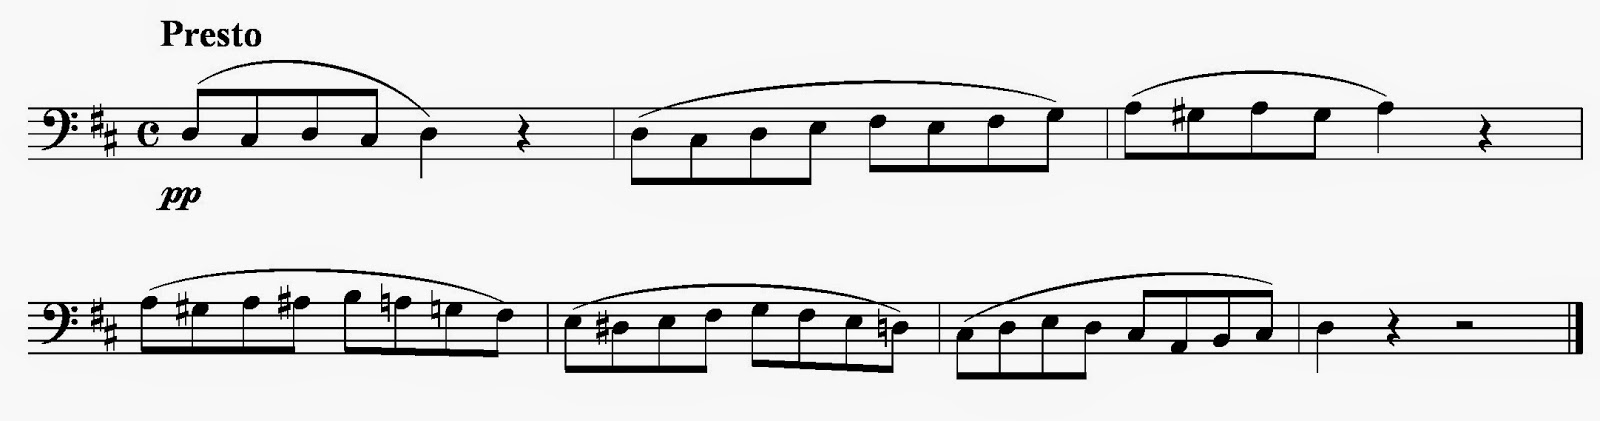
An Example:

 Performance tempo = 144

=130                                             X
=125                                        XX/XX
=120                                      XXX/XXX
=115                                   XXXX/XXXX
♩ =110                                XXXXX/XXXXX

3. Start with the slowest speed, = 110 and play 5 times, move up to = 115 and play four times, etc. After playing at = 130 once, move back down in order: ♩ = 125 2x, ♩ = 120 3x, etc.

4. During all of this, make sure that you can execute ALL repetitions at all speeds perfectly. If this isn't possible, then re-structure your "pyramid" to make it easier. 

5. The focus should be on calm, clean, matter-of-fact playing throughout. 

6. Later you can move the pyramid's speeds up so that the top tempo reaches the performance tempo you want.

7. This technique can also be used for a passage that is just being learned -- not ready to be played up to tempo. Choose a top speed at which you can play the notes perfectly with confidence, but must focus intensely on doing so. The slowest speed in the pyramid should easy for you, but not boring.

8. As the week progresses you can move the speeds up or increase the "distance" between speeds in the pyramid's levels to work towards your performance tempo.

9. Increments between speeds can be adjusted. Putting too large an increment between speeds can result in a top speed that's too fast or a bottom speed that's unnecessary.

10. With #6, you can incorporate other techniques if you want, such as changing rhythms or articulations.

11. Watch for tension in the body. Excessive use of an exercise like this can lead to a repetitive use injury.

Wednesday, March 25, 2015

The Universal Mind of Bill Evans

Bill Evans was one of the great jazz pianists.

I never heard him play live, but fondly remember an impromptu concert given by Bill Dobbins, who was my Jazz History teacher at Eastman, in his honor shortly after he died in 1980. Dobbins, dressed in black, gave us an evening of Evans' tunes on solo piano.

Here is an interview done by his brother, Harry. In it he discusses many things; improvising, creativity, teaching, etc. Lots of great playing, too! The audio is in English, with Spanish subtitles.


Monday, March 23, 2015

Practice Techniques -- The Burst

In a previous post, I described a method I use to build fluency and evenness in a technical passage while gaining a better feel for its structure.

This method (I call it "Skeletonization") works best when first learning a passage at a slow tempo or when trying to polish it at a faster tempo.

The method I'll discuss in this post -- The Burst Method -- is a more advanced technical practice method. It is best used after the notes in a passage are learned and most technical problems are solved.

Many of us are good at slow, careful practice. However, this kind of practice only takes you so far. Often, it's tough to move from slow practice to getting a passage up to tempo. Sometimes, there's a kind of barrier you hit.

The Burst is a great way to get a difficult passage up to tempo with security and consistency.


How It Works:

A. Choose a passage which is tough to play up to tempo cleanly and with consistency.

Let's use the latter half of the opening of Figaro as an example:

B. In that passage, choose a section that is easy for you to play PERFECTLY up to tempo 5-7 times in a row. Every difficult passage has at least a short section that is easy to replicate perfectly.  Use a metronome to keep yourself honest.
C. Next, add a small, manageable segment to the section and repeat 5-7 times perfectly:
D. Continue adding small segments until you've built up the whole passage:

Here is another way to use this method:

A. Taking another section of Figaro,

B. Start with a segment that involves a particular technical challenge that gives you problems. Choose a small enough segment so you can just focus on solving that particular problem first:

 
C. Then add segments before and after the tough spot, maintaining technical control over the original segment.


D. Now add segments after the trouble spot.


Here are some points to keep in mind when using this method:

1. Use patience and humility when practicing! Choose segments that make sense both from the standpoint of manageability and problem solving.

2. When adding segments, if you find you can't repeat a section perfectly up to tempo 5-7 times, STOP!!

3. Do not practice mistakes! Be honest and willing to go back to practicing a smaller segment if that's the best you can do in a practice section. "Pride cometh before a fall!"

4. The process of building a perfect, repeatable renditions of a difficult passage like Figaro up to tempo may take several days or even weeks. Work diligently and patiently. Practice should be in a mental zone requiring focused concentration, not easy comfort or an overwhelming feeling of panic or recklessness. For more about this, see this previous post.

5. Tailor the Burst Method to your own needs and ability. Everyone is different. The choices I made above might work for you, but maybe you'd make different choices. It's a very flexible method.

Wednesday, March 18, 2015

Practice Techniques -- The Skeleton


This is the first in a series of posts I'm writing about technical practice methods.

There are many well-known practice methods out there for learning music. However, in my teaching and in my own practice, I've found that there are few that are effective in addressing issues that come up in the advanced stage of technique.

The issues I refer to are those that come up after the notes are learned: in particular, getting difficult passages up to tempo and maintaining consistent flawless execution.

I have found three techniques that are especially helpful for consistency and tempo.

These are:

The Skeleton, The Burst, and The Pyramid


The Skeleton

The term, "skeleton" or "skeletonization" refers to a method in which the structure or "bones" of a passage are isolated and then integrated to give an evenness, a flow and a sense of purpose to a passage.

I learned about this technique from our former Second Bassoonist, Billy Hestand. Billy was first exposed to it in the Performance Techniques Class he took at the Manhattan School of Music with Dr. Carol Aicher. She was kind enough to share her ideas with me in preparation for this post.


In this series I'll use the Marriage of Figaro Overture as an example.

Most of us find this one of the most challenging excerpts there is.

A lot of bassoonists have trouble getting this one up to tempo while maintaining control of every note. Acquiring consistency in execution time after time is also difficult.

This method is very simple to understand and apply. In its most basic form it involves playing the beat notes in a passage while removing notes in between beats.


A. Stage One

1. Play through with just the downbeat notes. Tongue each note. Go slow at first if you need to and make your eye focus on each downbeat note while skipping over the notes in the parentheses.

2. Keeping the tempo slow, play again, tonguing just the downbeat notes, but try to hear or sing to yourself the rest of the notes WHILE PLAYING. Make a nice phrase and try to use your airstream much as you would when playing everything.

3. Move up the tempo. Keep your eyes on the "skeleton notes".

4. When you can do this comfortably, go on to the next stage.


Stage 2

 Repeat the method outlined above for this Stage.


Stage 3

Now play "The Real Thing" up to tempo!  I think you'll be impressed with how fluid and easy your fingers feel!


The Skeleton Method works well for excerpts like Beethoven 4th, Ravel Piano Concerto 3rd movement, but can be used for any technical passage.

Another technique related to this method involves simply clapping the rhythm of a passage before playing it. Wind players can also add "saying" the articulations without the instrument or using just the reed. If you can't say it, you can't play it!!

Here's a good example of a passage I'd clap out or try saying to a beat before playing it. It's from Jeff Rathbun's new "Rocky River Music" -- a work for Wind Octet that we're playing in Chagrin Falls this Friday evening.

Try clapping through this one. Dotted quarter note beat, 6/8 time, dotted quarter = 92


Monday, March 9, 2015

No Coke -- (No) Pepsi!! -- No Brands of Cane?


This classic Saturday Night Live skit makes fun of the ubiquity and dominance of blockbuster brand names like Coke and Pepsi.

We have this in the world of cane dealers, as well.  There are bassoonists who are fiercely loyal to a particular brand of cane and will not try other types.

I believe brand loyalty in cane is vastly over-rated.

Here are some things to remember:

1. Cane growers and dealers are in business to make a profit like anyone else. These are not charities!
They try to sell as much cane as possible to keep in business.

3. Cane quality differs more from harvest to harvest than from brand to brand. Everyone who has purchased from one source year after year has experienced this, certainly. Like wine producers, weather plays a big role in quality.

4. The gouge plays as much of a role in whether or not you like the cane as does the brand.

5. Any performer facing the need to play many different kinds of music during a week or month of performances is smart to keep reeds made from several different sources in the reed box. Reliance upon one brand will narrow your expressive capability and hinder execution of the often disparate demands placed upon you!

Recently, Miller Marketing Co. began offering a selection of cane I've chosen based upon measurement for cane hardness and density.

If you've read my recent post announcing this new line, you may have wondered what kind of cane I'm measuring.

The answer is, I don't know! The large batches of cane I measure are generally unmarked. I'm not very concerned about this, either!

With this selection method we are trying something new. My selection of cane is not based upon where it is grown or how it is processed (although the gouge is mildly elliptical and of moderate thickness). Over the years, I have measured cane from France, Italy, Spain and California and found pieces to use from each region.

While it is hard to compare different brands of cane, given differences in gouge, length, and also in the general look and feel of the different types, measuring for hardness and density alone allows me to focus only on the objective physical characteristics of an individual piece of cane.

This is how I bridge any differences between brands and select pieces from any source which have the best chance for success on the bocal.


Tuesday, March 3, 2015

Buy Cane I Select

The Miller Marketing Company is now selling a line of cane that I've selected:   

Miller-Stees Gouged Bassoon Cane

This is gouged bassoon cane that I've tested in the following ways:

  •  All pieces are straight (not warped in any direction). No cracked pieces.
  •  All pieces fall within my personal acceptable range for hardness.
  •  All pieces fall within my personal acceptable range for density.

I've used this method for over two years now. During this time, I've seen my yield of good reeds DOUBLE from previous!

The time taken to select out unacceptably hard/soft, dense/porous cane is more than made up for by the time saved later in the production process.

I now spend MUCH less time profiling, shaping, forming, wrapping, drying, and trying to finish reeds made from cane that wasn't destined to work anyway.

While my use of these methods will not identify a great piece of cane, they do help me select out most of the pieces in a batch that are marginal or poor in quality.

To purchase some of this cane, please visit Miller Marketing Company and order directly from them.

If you want to know more about my methods, please see this recent post and this one, too.

Combining Density and Hardness to Select Cane

Expanding My Zone


In this post, I'll explain why I use both measurements to select cane for use.

In two previous posts, I outlined my methods for finding the density and hardness of a piece of cane.

It is safe to generalize that most hard cane is also dense, and most soft cane is also more diffuse or porous.

However, in my years of trial combining these two methods, I've discovered that, from time to time, I'll select a piece of cane that is on the fringe of the "good zone" for hardness, but in the "good zone" for density or vice-versa, and I'll make a good reed out of that piece.

Thus, combining measurements using the two methods of selection allows a greater yield of good reeds from the same batch of cane.


Measuring Cane Density

How I Measure Cane Density

In a previous post, I outlined my method for measuring cane hardness. Although hardness and density are closely related (it makes sense that a hard piece of cane may be more dense compared to soft piece -- and my measurements mostly bear this out), I have found enough reason to measure both.

In this post, I'd like to describe my method and my findings for measuring cane density. I have been using this method in concert with measuring hardness for two years now. I feel I have amassed enough results to draw some solid conclusions from my efforts.

What I'm about to share with you is a way of selecting cane that has doubled my yield of good reeds made from blanks using this process.

Before this, I would average maybe 2 good reeds from 10 blanks. Pretty good, considering the standard I have to maintain given the musical crucible of The Cleveland Orchestra. Now I consistently get 4-5 out of 10!

First, I'd like to acknowledge the help I received in pursuing this idea from bassoonist, David Rachor and Jean-Marie Heinrich, a scientist who has devoted much of his research to the physics, botany and geometry of arundo donax (our cane).

Measuring Density

Density is commonly measured in relation to water, which is given a value of 1. Thus, something less dense than water (all cane in a dry state) will measure between 0 and 1.

D=   M 
        V (volume)

This is the equation used to determine the density of a substance.

A pycnometer is most commonly used in measuring density.


The density is measured by the amount of water displaced by a substance when it is immersed in a chamber filled with water. A more dense substance will displace a greater amount of water.

To determine the density of a piece of cane using this equation, you need a strictly constant volume of water and mass from trial to trial and piece of cane to piece of cane. Thus, the pieces of cane measured must be as close in mass to each other as possible (this would necessitate lots of minute trimming to the pieces of cane). Keeping a constant amount of water in a chamber while measuring many pieces of cane would probably prove too difficult for easy use. Just the act of taking a piece of wet cane out of the water when finished measuring would change the volume minutely, and, over time, skew the results a fair amount.

Measuring cane density this way is too fussy and time consuming.

The test I use does not directly measure the density of cane. What it measures is the specific gravity of a piece of cane and compares it with that of water.

I use a scale with a calibration of .01g. A tolerance this small is necessary to show the minute differences in density from piece to piece. A postal scale or a kitchen scale isn't accurate enough to detect differences in cane mass.


The Method

  • First I weigh a dry piece of cane. It can be gouged, shaped, profiled, simply gouged or just a split piece of tube.
  • I record the dry mass. (M1)
  • Then I submerge the cane in a pan of water suspended over the scale by placing it under a rack that sits on the scale.
  • I record the wet mass (M2) and remove the cane from the water. It spends just a few seconds in the water.
Next I use the following formula to ascertain the density of the piece of cane:

D= density, M1=dry mass, M2=wet mass

D =   M1   
      M1+M2

What I'm measuring is could also be described as buoyancy or porosity. Cane that exerts more upward force under water against the rack than that which doesn't is more buoyant. I'm measuring the mass of a piece of cane in two different media -- air and water.

Since dry, aged cane is composed of cellulose fiber and lots of air spaces, it is reasonable to assume therefore, that cane with more air spaces per square millimeter will be correspondingly less dense than cane with fewer spaces.

This indirect way of measuring cane density takes about 20 seconds

Measuring Cane Hardness

How I Measure Cane for Hardness


I have used a hardness tester for about 20 years. While this tool will not identify great pieces of cane, it will help you select out most of the ones that will never be made into good reeds.


For those of you not familiar with a hardness tester (or impact meter), this is how it works and how I use it.

The machine has a pin that is driven into the cane using a consistent amount of force for each test. The result is an extremely small indentation in the gouge of the cane.

The meter measures the pin's depth of penetration into the gouge. The deeper the penetration, the softer the cane.

This method of selection is simple and easy, but there are a few things to keep in mind.

Some Lack of Consistency

Anyone who has used one of these machines knows that no piece of cane yields the same hardness measurement throughout the length of the gouge. Thus, I do a few things to ensure I come up with a measurement that most accurately captures the degree of hardness for the WHOLE piece of gouged cane without spending an inordinate amount of time in measurement.

1. I could share with you the hardness numbers that fall within my "acceptable" range. Unfortunately, the number range I use may be useless to you!  Even users of two machines of the same brand may find that the two machines vary in their assessments of hardness for the same piece of cane.

Therefore, some trial and error is necessary in coming up with a number range that is useable.

2. Any piece of cane will vary in hardness throughout its gouge. There are a few ways to even out this inconsistency, though.

Sand the gouge before measuring. Many commercial gouges are rough and uneven. Places on the gouge that are thicker than the rest will yield a higher (softer) measurement than those that are thinner. If the pin drops on a low point in the gouge thickness it may give a reading that is lower (harder) than if it were to fall on a high point.

A light sanding with 400 grade sandpaper will smooth out the peaks and valleys inherent in the grain of the cane and help ensure a more accurate reading.

3. The tip is the most sensitive, reactive part of any reed. Therefore, the most critical part of the gouge for a hardness measurement is in the middle area where the two reed blade tips will be profiled. Since I do not want to place a divot in the gouge in either of these areas, I measure the point exactly midway between the ends of the gouged piece (where the fold will be). This point is close enough to the tip areas to give me an idea of how hard the cane is in these two regions.

4. If the fold measurement doesn't fall within range, I reject those pieces that are too hard. Softer pieces can either be stored for later evaluation -- a year or two of storage is sometimes sufficient for the cane to harden up -- or the cane can be gouged thinner to produce a harder measurement.

5. If the fold measurement falls within the useable range, I will measure the hardness at both ends and average the three numbers to come up with an average hardness for the whole piece.  Because some ends have "gouger bites" or other imperfections in the gouge, I always measure in from the end at least a quarter inch.

6. I then write the hardness number on the gouged piece with pencil. Later, I'll write the number on the blade of the finished reed for identification in the reed case.

This method, which takes takes less than a minute for each piece, has saved me a lot of time during the finishing stage as I now work on many fewer questionable blanks. I also worry less that I might be throwing out pieces of cane that I could have used. 

You can also use this method for measuring cane that is already shaped. If the cane is profiled as well, simply skip the fold measurement and measure the two ends and average.