I've updated my previous post about cane density, thanks to some helpful corrections from Jean-Marie Heinrich. Some of the terminology I used was incorrect or inaccurate and he also provided more information on his methods.
Since this post got (is getting) a lot of views, I thought I would update it to show these corrections. If you've already read it, go back and have a look again. I think it will make more sense now.
Heinrich also sent me this discovery from under his microscope.
Bassoon Cane Christmas Omen?
Showing posts with label Cane selection. Show all posts
Tuesday, December 19, 2017
Thursday, December 14, 2017
Cane microscopy
I recently received a wonderful email from researcher, Jean-Marie Heinrich. He is the one who wrote the article, "The Bassoon Reed", published in the Journal of the International Double Reed Society. Required reading for all serious reed makers!
Jean-Marie shared with me some photos of cane taken at the microscopic level. He has added a level of artistry through use of different dyes.
Most notable are his comparisons of cane of different densities. Here is scientific evidence of why reeds feel different from one to the next, although the construction may be nearly identical.
In the photos, the background material is cellulose, the triangular or teardrop shaped objects are lignified cellulose or vascular bundles. A lignin is: "A complex organic compound that binds to cellulose fibers and hardens and strengthens the cell walls of plants." - American Heritage Science Dictionary.
The vascular bundles surround two tubular structures called the xylem. They function as a circulatory system for nutrients in Arundo donax.
More and/or thicker vascular bundles = dense cane.
A split piece of tube cane showing high density. Cellulose is the white background, vascular bundles, brown/yellow "teardrops". The more important difference between this photo and the one below is the thicker bark in the photo above. (no dye or reagent used)
Another piece showing low density. Vascular bundles thinner and less numerous. Bark is thinner. (no dye or reagent used)
High density with cellulose appearing blue, lignified cells appear green. High lignification, thick bark. These two samples were not stained, but the colors are the result of chemical reaction to the reagent Toluidine blue. Cellulose and lignified cells react differently to the reagent, thus resulting in different colors.
Low density with blue staining. Cell wall structure immature. Almost no lignification.
Oboe cane microscopy -- high density. The vascular bundles look like little aliens floating in cellulose!
Oboe cane (same magnification) - low density.
1000 sections of oboe cane tube sorted by density. Lowest density on the left, highest on right. Each reed maker must draw his/her own conclusions about what density is best for use in reed making. A sample of not less than 1000pcs is large enough for accurate and repeatable results.
Sunday, April 24, 2016
Website is back!
My website, steesbassoon.com is back! It's been redesigned by my daughter, Grace, who is a graphic designer.
Most of the old content is still there, including the reed making instructions. Thanks to those of you who use it for reed making for your patience!
Labels:Intro
Bassoon Sound,
Cane selection,
Reed Making
Tuesday, March 29, 2016
The Best Cane in Japan
My wife is an amateur microscopist and subscribes to Microscopy Today. In this month's issue there is an article about research done on Phragmites australis, cane that grows naturally in Japan that has been used for centuries to make reeds for the Hichiriki, a double reed instrument.
Using the input from a player of the Hichiriki, the researchers found that the best cane came from the banks of the Udono river in Japan. Other sources yielded cane with less desirable qualities for the player. Cane from this particular site has been harvested and made into reeds for over 1200 years!
The researchers took microscopic samples of cane from various sources, including the Udono and conducted analysis.
The results showed the cane from the Udono had the most consistent internal structure and a shell thickness of 1mm.
There is much to be learned from this research for the maker of reeds from Arundo donax, and, indeed, research on Arundo donax is cited in the article.
Here is a link to a pdf of the article. (Scroll down the table of contents to find the pdf link).
Thursday, December 10, 2015
The Reed Desk
My reed desk is starting to fill up with blanks. I get a lot of questions about how to get good reeds from your reed making.
Assuming proper tools and good workmanship, when dealing with cane we are ultimately faced with the predestination of botany.
It is indeed humbling to admit that, after decades of research and effort, I still make some reeds that will never be usable. I've spent a lot of time in this blog and on my website and in countless lessons with students sharing my wisdom about reed making.
However, I have to admit (as we all should) that often your efforts are defeated by poor cane quality. Even with the methods I use for cane selection, there are still factors in the cane that elude my eye.
So, when someone asks me how I ensure that I always have a few presentable reeds in my box, I give the following advice:
1. Never rely upon one source of cane for good reeds.
2. Keep a stock cane from at least three different sources at all times.
3. Always have blanks available from several different cane sources.
4. Leave them on your drying rack for at least two weeks -- longer will yield more good reeds.
5. Fill your reed case with reeds from these different sources.
6. Rotate your reeds for day-to-day use.
Labels:Intro
Cane selection,
Choosing Reeds,
Reed Making
Friday, May 22, 2015
Density photos
Monday, March 9, 2015
No Coke -- (No) Pepsi!! -- No Brands of Cane?
This classic Saturday Night Live skit makes fun of the ubiquity and dominance of blockbuster brand names like Coke and Pepsi.
We have this in the world of cane dealers, as well. There are bassoonists who are fiercely loyal to a particular brand of cane and will not try other types.
I believe brand loyalty in cane is vastly over-rated.
Here are some things to remember:
1. Cane growers and dealers are in business to make a profit like anyone else. These are not charities!
They try to sell as much cane as possible to keep in business.
3. Cane quality differs more from harvest to harvest than from brand to brand. Everyone who has purchased from one source year after year has experienced this, certainly. Like wine producers, weather plays a big role in quality.
4. The gouge plays as much of a role in whether or not you like the cane as does the brand.
5. Any performer facing the need to play many different kinds of music during a week or month of performances is smart to keep reeds made from several different sources in the reed box. Reliance upon one brand will narrow your expressive capability and hinder execution of the often disparate demands placed upon you!
Recently, Miller Marketing Co. began offering a selection of cane I've chosen based upon measurement for cane hardness and density.
If you've read my recent post announcing this new line, you may have wondered what kind of cane I'm measuring.
The answer is, I don't know! The large batches of cane I measure are generally unmarked. I'm not very concerned about this, either!
With this selection method we are trying something new. My selection of cane is not based upon where it is grown or how it is processed (although the gouge is mildly elliptical and of moderate thickness). Over the years, I have measured cane from France, Italy, Spain and California and found pieces to use from each region.
While it is hard to compare different brands of cane, given differences in gouge, length, and also in the general look and feel of the different types, measuring for hardness and density alone allows me to focus only on the objective physical characteristics of an individual piece of cane.
This is how I bridge any differences between brands and select pieces from any source which have the best chance for success on the bocal.
Tuesday, March 3, 2015
Buy Cane I Select
The Miller Marketing Company is now selling a line of cane that I've selected:
Miller-Stees Gouged Bassoon Cane
This is gouged bassoon cane that I've tested in the following ways:
I've used this method for over two years now. During this time, I've seen my yield of good reeds DOUBLE from previous!
The time taken to select out unacceptably hard/soft, dense/porous cane is more than made up for by the time saved later in the production process.
I now spend MUCH less time profiling, shaping, forming, wrapping, drying, and trying to finish reeds made from cane that wasn't destined to work anyway.
While my use of these methods will not identify a great piece of cane, they do help me select out most of the pieces in a batch that are marginal or poor in quality.
To purchase some of this cane, please visit Miller Marketing Company and order directly from them.
If you want to know more about my methods, please see this recent post and this one, too.
Miller-Stees Gouged Bassoon Cane
This is gouged bassoon cane that I've tested in the following ways:
- All pieces are straight (not warped in any direction). No cracked pieces.
- All pieces fall within my personal acceptable range for hardness.
- All pieces fall within my personal acceptable range for density.
I've used this method for over two years now. During this time, I've seen my yield of good reeds DOUBLE from previous!
The time taken to select out unacceptably hard/soft, dense/porous cane is more than made up for by the time saved later in the production process.
I now spend MUCH less time profiling, shaping, forming, wrapping, drying, and trying to finish reeds made from cane that wasn't destined to work anyway.
While my use of these methods will not identify a great piece of cane, they do help me select out most of the pieces in a batch that are marginal or poor in quality.
To purchase some of this cane, please visit Miller Marketing Company and order directly from them.
If you want to know more about my methods, please see this recent post and this one, too.
Combining Density and Hardness to Select Cane
Expanding My Zone
In this post, I'll explain why I use both measurements to select cane for use.
In two previous posts, I outlined my methods for finding the density and hardness of a piece of cane.
It is safe to generalize that most hard cane is also dense, and most soft cane is also more diffuse or porous.
However, in my years of trial combining these two methods, I've discovered that, from time to time, I'll select a piece of cane that is on the fringe of the "good zone" for hardness, but in the "good zone" for density or vice-versa, and I'll make a good reed out of that piece.
Thus, combining measurements using the two methods of selection allows a greater yield of good reeds from the same batch of cane.
Measuring Cane Density
How I Measure Cane Density
In a previous post, I outlined my method for measuring cane hardness. Although hardness and density are closely related (it makes sense that a hard piece of cane may be more dense compared to soft piece -- and my measurements mostly bear this out), I have found enough reason to measure both.
In this post, I'd like to describe my method and my findings for measuring cane density. I have been using this method in concert with measuring hardness for two years now. I feel I have amassed enough results to draw some solid conclusions from my efforts.
What I'm about to share with you is a way of selecting cane that has doubled my yield of good reeds made from blanks using this process.
Before this, I would average maybe 2 good reeds from 10 blanks. Pretty good, considering the standard I have to maintain given the musical crucible of The Cleveland Orchestra. Now I consistently get 4-5 out of 10!
First, I'd like to acknowledge the help I received in pursuing this idea from bassoonist, David Rachor and Jean-Marie Heinrich, a scientist who has devoted much of his research to the physics, botany and geometry of arundo donax (our cane).
Measuring Density
Density is commonly measured in relation to water, which is given a value of 1. Thus, something less dense than water (all cane in a dry state) will measure between 0 and 1.
D= M
V (volume)
This is the equation used to determine the density of a substance.
A pycnometer is most commonly used in measuring density.
The density is measured by the amount of water displaced by a substance when it is immersed in a chamber filled with water. A more dense substance will displace a greater amount of water.
To determine the density of a piece of cane using this equation, you need a strictly constant volume of water and mass from trial to trial and piece of cane to piece of cane. Thus, the pieces of cane measured must be as close in mass to each other as possible (this would necessitate lots of minute trimming to the pieces of cane). Keeping a constant amount of water in a chamber while measuring many pieces of cane would probably prove too difficult for easy use. Just the act of taking a piece of wet cane out of the water when finished measuring would change the volume minutely, and, over time, skew the results a fair amount.
Measuring cane density this way is too fussy and time consuming.
The test I use does not directly measure the density of cane. What it measures is the specific gravity of a piece of cane and compares it with that of water.
I use a scale with a calibration of .01g. A tolerance this small is necessary to show the minute differences in density from piece to piece. A postal scale or a kitchen scale isn't accurate enough to detect differences in cane mass.
The Method
D= density, M1=dry mass, M2=wet mass
D = M1
M1+M2
What I'm measuring is could also be described as buoyancy or porosity. Cane that exerts more upward force under water against the rack than that which doesn't is more buoyant. I'm measuring the mass of a piece of cane in two different media -- air and water.
Since dry, aged cane is composed of cellulose fiber and lots of air spaces, it is reasonable to assume therefore, that cane with more air spaces per square millimeter will be correspondingly less dense than cane with fewer spaces.
This indirect way of measuring cane density takes about 20 seconds
In a previous post, I outlined my method for measuring cane hardness. Although hardness and density are closely related (it makes sense that a hard piece of cane may be more dense compared to soft piece -- and my measurements mostly bear this out), I have found enough reason to measure both.
In this post, I'd like to describe my method and my findings for measuring cane density. I have been using this method in concert with measuring hardness for two years now. I feel I have amassed enough results to draw some solid conclusions from my efforts.
What I'm about to share with you is a way of selecting cane that has doubled my yield of good reeds made from blanks using this process.
Before this, I would average maybe 2 good reeds from 10 blanks. Pretty good, considering the standard I have to maintain given the musical crucible of The Cleveland Orchestra. Now I consistently get 4-5 out of 10!
First, I'd like to acknowledge the help I received in pursuing this idea from bassoonist, David Rachor and Jean-Marie Heinrich, a scientist who has devoted much of his research to the physics, botany and geometry of arundo donax (our cane).
Measuring Density
Density is commonly measured in relation to water, which is given a value of 1. Thus, something less dense than water (all cane in a dry state) will measure between 0 and 1.
D= M
V (volume)
This is the equation used to determine the density of a substance.
A pycnometer is most commonly used in measuring density.
The density is measured by the amount of water displaced by a substance when it is immersed in a chamber filled with water. A more dense substance will displace a greater amount of water.
To determine the density of a piece of cane using this equation, you need a strictly constant volume of water and mass from trial to trial and piece of cane to piece of cane. Thus, the pieces of cane measured must be as close in mass to each other as possible (this would necessitate lots of minute trimming to the pieces of cane). Keeping a constant amount of water in a chamber while measuring many pieces of cane would probably prove too difficult for easy use. Just the act of taking a piece of wet cane out of the water when finished measuring would change the volume minutely, and, over time, skew the results a fair amount.
Measuring cane density this way is too fussy and time consuming.
The test I use does not directly measure the density of cane. What it measures is the specific gravity of a piece of cane and compares it with that of water.
I use a scale with a calibration of .01g. A tolerance this small is necessary to show the minute differences in density from piece to piece. A postal scale or a kitchen scale isn't accurate enough to detect differences in cane mass.
The Method
- First I weigh a dry piece of cane. It can be gouged, shaped, profiled, simply gouged or just a split piece of tube.
- I record the dry mass. (M1)
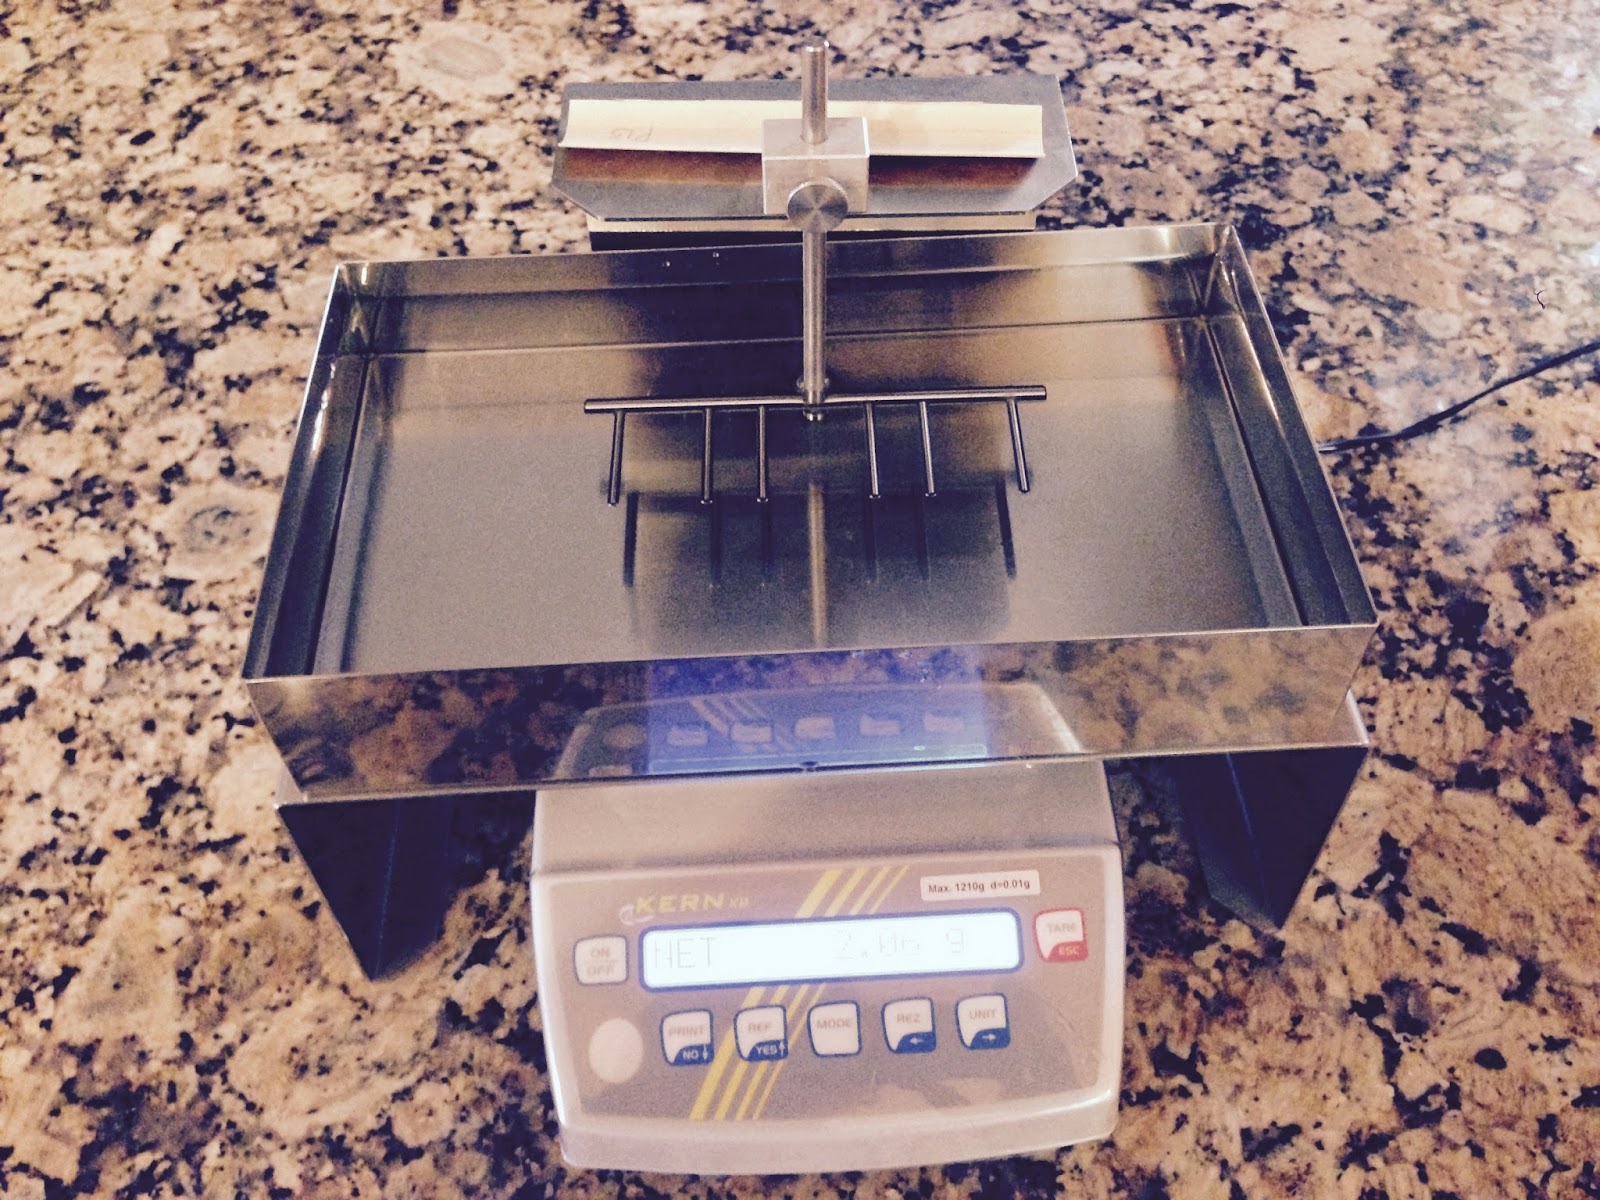
- Then I submerge the cane in a pan of water suspended over the scale by placing it under a rack that sits on the scale.
- I record the wet mass (M2) and remove the cane from the water. It spends just a few seconds in the water.
D= density, M1=dry mass, M2=wet mass
D = M1
M1+M2
What I'm measuring is could also be described as buoyancy or porosity. Cane that exerts more upward force under water against the rack than that which doesn't is more buoyant. I'm measuring the mass of a piece of cane in two different media -- air and water.
Since dry, aged cane is composed of cellulose fiber and lots of air spaces, it is reasonable to assume therefore, that cane with more air spaces per square millimeter will be correspondingly less dense than cane with fewer spaces.
This indirect way of measuring cane density takes about 20 seconds
Measuring Cane Hardness
How I Measure Cane for Hardness
I have used a hardness tester for about 20 years. While this tool will not identify great pieces of cane, it will help you select out most of the ones that will never be made into good reeds.
For those of you not familiar with a hardness tester (or impact meter), this is how it works and how I use it.
The machine has a pin that is driven into the cane using a consistent amount of force for each test. The result is an extremely small indentation in the gouge of the cane.
The meter measures the pin's depth of penetration into the gouge. The deeper the penetration, the softer the cane.
This method of selection is simple and easy, but there are a few things to keep in mind.
Some Lack of Consistency
Anyone who has used one of these machines knows that no piece of cane yields the same hardness measurement throughout the length of the gouge. Thus, I do a few things to ensure I come up with a measurement that most accurately captures the degree of hardness for the WHOLE piece of gouged cane without spending an inordinate amount of time in measurement.
1. I could share with you the hardness numbers that fall within my "acceptable" range. Unfortunately, the number range I use may be useless to you! Even users of two machines of the same brand may find that the two machines vary in their assessments of hardness for the same piece of cane.
Therefore, some trial and error is necessary in coming up with a number range that is useable.
2. Any piece of cane will vary in hardness throughout its gouge. There are a few ways to even out this inconsistency, though.
Sand the gouge before measuring. Many commercial gouges are rough and uneven. Places on the gouge that are thicker than the rest will yield a higher (softer) measurement than those that are thinner. If the pin drops on a low point in the gouge thickness it may give a reading that is lower (harder) than if it were to fall on a high point.
A light sanding with 400 grade sandpaper will smooth out the peaks and valleys inherent in the grain of the cane and help ensure a more accurate reading.
3. The tip is the most sensitive, reactive part of any reed. Therefore, the most critical part of the gouge for a hardness measurement is in the middle area where the two reed blade tips will be profiled. Since I do not want to place a divot in the gouge in either of these areas, I measure the point exactly midway between the ends of the gouged piece (where the fold will be). This point is close enough to the tip areas to give me an idea of how hard the cane is in these two regions.
4. If the fold measurement doesn't fall within range, I reject those pieces that are too hard. Softer pieces can either be stored for later evaluation -- a year or two of storage is sometimes sufficient for the cane to harden up -- or the cane can be gouged thinner to produce a harder measurement.
5. If the fold measurement falls within the useable range, I will measure the hardness at both ends and average the three numbers to come up with an average hardness for the whole piece. Because some ends have "gouger bites" or other imperfections in the gouge, I always measure in from the end at least a quarter inch.
6. I then write the hardness number on the gouged piece with pencil. Later, I'll write the number on the blade of the finished reed for identification in the reed case.
This method, which takes takes less than a minute for each piece, has saved me a lot of time during the finishing stage as I now work on many fewer questionable blanks. I also worry less that I might be throwing out pieces of cane that I could have used.
You can also use this method for measuring cane that is already shaped. If the cane is profiled as well, simply skip the fold measurement and measure the two ends and average.
Subscribe to:
Posts (Atom)